Capteur de température
Objectif
Relever la température mesurée par l'objet, l'envoyer par SMS et représenter graphiquement son évolution.
Matériel utilisé : Feather M0 et capteur de température DS18B20.
Ce projet sera fait de deux façons : en C et en python.
Nous allons envoyer la température dans un paquet LoRaWAN pour la récupérer via MQTT et l'envoyer par SMS (avec Node-RED).
Nous utiliserons également Grafana pour représenter les données après les avoir importée dans une base de donnée InfluxDB.
Tous ces outils sont accessibles sur les serveurs de Tetaneutral.net.
Capteur de température DS18B20
Nous utiliserons un capteur de température numérique de type "one-wire" DS18B20.
Voir la datasheet du composant : https://datasheets.maximintegrated.com/en/ds/DS18B20.pdf
Librairies
Installez les librairies :
OneWirevia l'IDE ArduinoDallasTemperatureque vous trouverez ici : https://github.com/milesburton/Arduino-Temperature-Control-Library
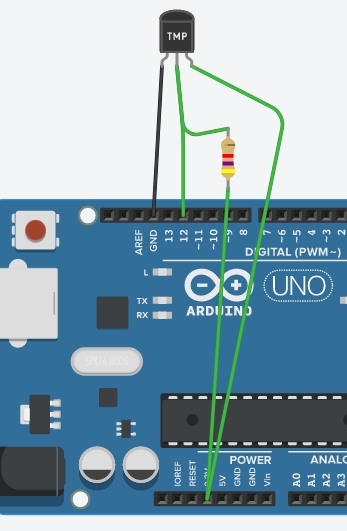
Cablage
En prenant le DS18B20 avec le méplat face à vous, la masse est à gauche, l'alimentation à droite et le bus de données au milieu.
Le cablage ci-dessous est pour Arduino mais c'est la même chose avec un feather...
Sketch d'exemple
/*******************************************************************************
 * Copyright (c) 2015 Thomas Telkamp and Matthijs Kooijman
 * Modifié par NG et RB (IUT de Blagnac). *
 * This uses OTAA (Over-the-air activation).
 *
 * This code use a "one-wire" DS18B20 temperature sensor
 * and send this temperature to loraserver.
 *
 * With the help of Node-Red and influsDB, one can easily plot temperature ! *
 *
 *******************************************************************************/

#include <Arduino.h>
#include <lmic.h>
#include <hal/hal.h>
#include <SPI.h>
#include <OneWire.h>
#include <DallasTemperature.h>

/******************************************************************************/
/* OneWire                                                                    */
/******************************************************************************/
// DS18B20 on Feather M0

#define ONE_WIRE_BUS 12

// Setup a oneWire instance to communicate with any OneWire devices (not just Maxim/Dallas temperature ICs)
OneWire oneWire(ONE_WIRE_BUS);

// Pass our oneWire reference to Dallas Temperature.
DallasTemperature sensors(&oneWire);

float temp_float;

/******************************************************************************/
/* LoRaWAN                                                                    */
/******************************************************************************/

// This EUI must be in *little-endian format* (least-significant-byte first)
// Necessaire pour le protocole mais inutile pour l'implémentation dans loraserver
// On peut donc mettre de l'aléatoire ou :

static const u1_t APPEUI[8]={ 0x00, 0x00, 0x00, 0x00, 0x00, 0x00, 0x00, 0x00  };

// DEVEUI should also be in *little endian format*

static const u1_t DEVEUI[8]={ 0x0b, 0x07, 0x06, 0x05, 0x04, 0x03, 0x02, 0x01 };

// This key should be in big endian format

static const u1_t APPKEY[16] = { 0x00, 0x00, 0x00, 0x00, 0x00, 0x00, 0x00, 0x00, 0x00, 0x00, 0x00, 0x00, 0x00, 0x00, 0x00, 0x00 };

// Copie en mémoire des EUI et APPKEY
void os_getArtEui (u1_t* buf) { memcpy_P(buf, APPEUI, 8);}
void os_getDevEui (u1_t* buf) { memcpy_P(buf, DEVEUI, 8);}
void os_getDevKey (u1_t* buf) { memcpy_P(buf, APPKEY, 16);}

// Schedule TX every this many seconds (might become longer due to duty
// cycle limitations).
const unsigned TX_INTERVAL = 20;

/******************************************************************************/
/* pin mapping                                                                */
/******************************************************************************/

const lmic_pinmap lmic_pins = {
    .nss = 8,
    .rxtx = LMIC_UNUSED_PIN,
    .rst = LMIC_UNUSED_PIN,
    .dio = {3, 6, LMIC_UNUSED_PIN},//io1 pin is connected to pin 6, io2 vers pin 11
};

/******************************************************************************/
/* fonction do_send                                                           */
/******************************************************************************/

void do_send(osjob_t* j){
    // Check if there is not a current TX/RX job running
    if (LMIC.opmode & OP_TXRXPEND) {
        Serial.println(F("OP_TXRXPEND, not sending"));
    } else {
      Serial.print("Requesting temperatures...");

      sensors.requestTemperatures(); // Send the command to get temperatures
      Serial.println("DONE");

      // After we got the temperatures, we can prepare the payload.
      // We use the function ByIndex, and as an example get the temperature from the first sensor only.
      // Serial.print("Temperature for the device 1 (index 0) is: ");

      float temperature = sensors.getTempCByIndex(0);
     //Serial.print("Temperature for the device 1 (index 0) is: ");
     //Serial.println(temperature);
      // We have to convert the float into an ASCII representation
      // and load the paylod

      // we build the packet and concatenate text with float to string + 3 décimales

      String packet = String(temperature, 3);
      Serial.println(packet[0]);

      uint8_t lmic_packet[packet.length()+1];

      for(int i=0; i<packet.length()+1; i++){
        lmic_packet[i] = packet[i];
      }
      Serial.println(lmic_packet[0]);

       // Prepare upstream data transmission at the next possible time.

      LMIC_setTxData2(1, lmic_packet, sizeof(lmic_packet)-1, 0);

      Serial.println(F("Packet queued"));
    }
    // Next TX is scheduled after TX_COMPLETE event.
}
/******************************************************************************/
/* Automate LMIC                                                              */
/******************************************************************************/


static osjob_t sendjob;

void onEvent (ev_t ev) {
    Serial.print(os_getTime());
    Serial.print(": ");
    switch(ev) {
        case EV_JOINING:
            Serial.println(F("EV_JOINING"));
            break;
        case EV_JOINED:
            Serial.println(F("EV_JOINED"));

            // Disable link check validation (automatically enabled
            // during join, but not supported by TTN at this time).
            LMIC_setLinkCheckMode(0);
            break;
        case EV_JOIN_FAILED:
            Serial.println(F("EV_JOIN_FAILED"));
            break;
            break;
        case EV_TXCOMPLETE:
            Serial.println(F("EV_TXCOMPLETE (includes waiting for RX windows)"));
            if (LMIC.txrxFlags & TXRX_ACK)
              Serial.println(F("Received ack"));
            if (LMIC.dataLen) {
              Serial.println(F("Received "));
              Serial.println(LMIC.dataLen);
              Serial.println(F(" bytes of payload"));
            }
            // Schedule next transmission
            os_setTimedCallback(&sendjob, os_getTime()+sec2osticks(TX_INTERVAL), do_send);
            break;
        case EV_RXCOMPLETE:
            // data received in ping slot
            Serial.println(F("EV_RXCOMPLETE"));
            break;
        default:
            Serial.println(F("Unknown event, voir doc lmic"));
            break;
    }
}


void setup() {
    Serial.begin(9600);

    //**** OneWire ****
    Serial.println("Dallas Temperature IC Control Library Demo");
    // Start up the library
    sensors.begin();

    while (millis() < 5000) {
    Serial.print("millis() = "); Serial.println(millis());
    delay(500);
    }

    Serial.println(F("Starting"));

    #ifdef VCC_ENABLE
    // For Pinoccio Scout boards
    pinMode(VCC_ENABLE, OUTPUT);
    digitalWrite(VCC_ENABLE, HIGH);
    delay(1000);
    #endif

    // LMIC init
    os_init();
    // Reset the MAC state. Session and pending data transfers will be discarded.
    LMIC_reset();
    LMIC_setClockError(MAX_CLOCK_ERROR * 10 / 100);
    // Start job (sending automatically starts OTAA too)
    do_send(&sendjob);
}

void loop() {
  // call sensors.requestTemperatures() to issue a global temperature
  // request to all devices on the bus
  //Serial.print("Requesting temperatures...");
  //sensors.requestTemperatures(); // Send the command to get temperatures
  //Serial.println("DONE");
  // After we got the temperatures, we can print them here.
  // We use the function ByIndex, and as an example get the temperature from the first sensor only.
  //Serial.print("Temperature for the device 1 (index 0) is: ");
  //Serial.println(sensors.getTempCByIndex(0));

  os_runloop_once();
}
En s'abonnant au flux MQTT de notre node :
mosquitto_sub -h loraserver.tetaneutral.net -v -t application/5/device/010203040506070b/#
Nous obtenons :
application/5/device/010203040506070b/rx {"applicationID":"5","applicationName":"RB-home","deviceName":"RB-feather-M0","devEUI":"010203040506070b","rxInfo":[{"gatewayID":"3150000000000002","name":"toulouse_remi","rssi":-96,"loRaSNR":6.2,"location":{"latitude":43.60625069174644,"longitude":1.4709877967834475,"altitude":204}}],"txInfo":{"frequency":868300000,"dr":5},"adr":true,"fCnt":58,"fPort":1,"data":"MjMuMzc1"}
La commande :
echo "MjMuMzc1" | base64 -d
renvoie bien la température.
Envoyer la température par SMS (via Node-RED)
Installation de Node-RED
Tip
Si vous avez un compte sur le Node-RED de Tetaneutral.net, passez cette étape.
Installer Node-RED via les depôts ou utiliser un container docker (recommandé) ou encore un de nos services Noede-RED.
Premier lancement du container :
docker run -d -p 1880:1880 -v nodered_data:/data --name mynodered nodered/node-red-docker
Puis à l'avenir :
docker start mynodered
Accès à Node-RED : http://localhost:1880/
Envoyer la température par SMS
Ajoutez la "palette" sms-free-mobile dans Node-RED
Activez les "notifications par SMS" dans votre espace free-mobile (via Gérer mon compte/Mes options). Récupérez la clé d'identification au service.
Configurez la palette MQTT comme ci-dessous :
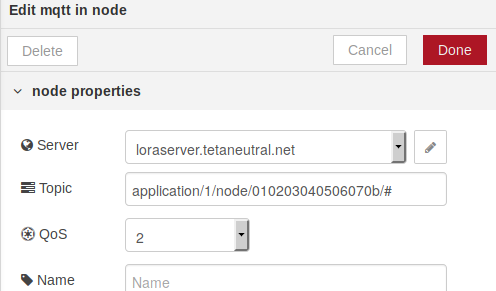
Pour avoir un flux du type :

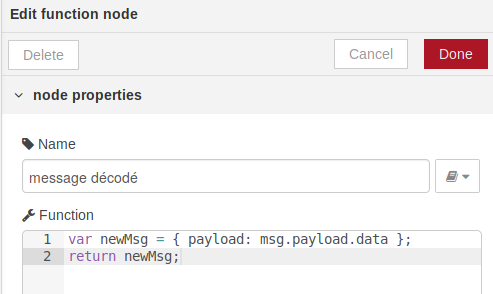
La palette fonction "message décodé" contient :
C'est tout !
Représenter les données dans grafana
Pousser les données dans influxDB
Toujours dans node-RED configurer comme suit :

La fonction Get Temperature contient :
var newMsg = { payload: parseFloat(msg.payload.data) };
return newMsg;
Format for influxdb :
var newMsg = { payload: [{'Température': msg.payload}, {'location': 'bureau'}] };
return newMsg;
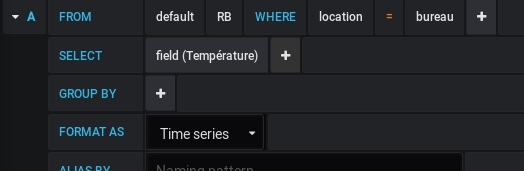
Affichage dans grafana
Il suffit de paramétrer un panel comme suit :
En python
Afficher la température
Suivre la documentation d'installation de CircuitPython.
Comme le capteur de température est un OneWire, il nous faut les pilotes à récupérer dans le bundle d'Adafruit :
https://github.com/adafruit/Adafruit_CircuitPython_Bundle/releases/latest
Selon votre version de CircuitPython, choisir le bon bundle et copier/coller dans le répertoire lib les fichiers ou dossiers suivants :
adafruit_onewireadafruit_ds18x20.mpy
Le code suivant (venant du dépôt gitub du bundle) permet de tester que tout fonctionne :
# Simple demo of printing the temperature from the first found DS18x20
# sensor every second.
# Author: Tony DiCola

import time

import board

from adafruit_onewire.bus import OneWireBus
from adafruit_ds18x20 import DS18X20

# Initialize one-wire bus on board pin D5.
ow_bus = OneWireBus(board.D12)

# Scan for sensors and grab the first one found.
ds18 = DS18X20(ow_bus, ow_bus.scan()[0])

# Main loop to print the temperature every second.
while True:
    print('Temperature: {0:0.3f}C'.format(ds18.temperature))
    print('Temp:{}'.format(ds18.temperature))
    time.sleep(1.0)
C'est le code trouvé dans la https://github.com/adafruit/Adafruit_CircuitPython_Bundle/releases/latest
[page du bundle] dans le fichier adafruit-circuitpython-bundle-examples.
Envoyer la température en LoRaWAN
Il suffit de fusionner le code ci-dessus avec celui de la page de mise en place du Feather M0 : https://boulle.frama.io/LoRaWAN-tetaneutral/post/feather-m0-lorawan-node/
import time
import busio
import digitalio
import board

from adafruit_tinylora.adafruit_tinylora import TTN, TinyLoRa
from adafruit_onewire.bus import OneWireBus
from adafruit_ds18x20 import DS18X20

# Board LED
led = digitalio.DigitalInOut(board.D13)
led.direction = digitalio.Direction.OUTPUT

# Config chipset radio
spi = busio.SPI(board.SCK, MOSI=board.MOSI, MISO=board.MISO)

# FeathM0 RFM9xPinout
cs = digitalio.DigitalInOut(board.RFM9X_CS)
irq = digitalio.DigitalInOut(board.RFM9X_D0)

# TTN Device Address, 4 Bytes, MSB
devaddr = bytearray([0x00, 0x22, 0x46, 0xe6])

# TTN Network Key, 16 Bytes, MSB
nwkey = bytearray([0x00, 0x00, 0x00, 0x00, 0x00, 0x00, 0x00, 0x00,
                   0x00, 0x00, 0x00, 0x00, 0x00, 0x00, 0x00, 0x00])

# TTN Application Key, 16 Bytess, MSB
app = bytearray([0x00, 0x00, 0x00, 0x00, 0x00, 0x00, 0x00, 0x00,
                 0x00, 0x00, 0x00, 0x00, 0x00, 0x00, 0x00, 0x00])

ttn_config = TTN(devaddr, nwkey, app, country='EU')

lora = TinyLoRa(spi, cs, irq, ttn_config)

# Initialize one-wire bus on board pin D5.
ow_bus = OneWireBus(board.D12)

# Scan for sensors and grab the first one found.
ds18 = DS18X20(ow_bus, ow_bus.scan()[0])

# Main loop to print and send the temperature.
while True:
    print('Temperature: {0:0.3f}C'.format(ds18.temperature))
    data=bytes('{0:0.3f}C'.format(ds18.temperature), 'utf-8')
    print('Sending packet..')
    led.value = True
    lora.send_data(data, len(data), lora.frame_counter)
    print('Packet sent!')
    led.value = False
    lora.frame_counter += 1
    time.sleep(10)
Recevoir des données
Pas encore implémenté dans la librairie : https://github.com/adafruit/Adafruit_CircuitPython_TinyLoRa
Voir : https://github.com/adafruit/Adafruit_CircuitPython_TinyLoRa/issues/7
Peut-être porter la stack LoRaWAN : https://github.com/jeroennijhof/LoRaWAN sous micropython ?
MQTT
On peut récupérer les données en MQTT :
mosquitto_sub -h loraserver.tetaneutral.net -v -t "application/5/device/010203040506070a/rx"